Visual Accounts
Powerful, easy to use, Accounting Software Users Love
http://www.visualaccounts.co.uk
Hi and welcome to the 4th of 6 Visual Accounts 2000 Tutorials. Each one is written from 'real life' experience and is designed to help you to unlock the all the power of Visual Accounts 2000.
In this edition we're going to spend some time looking at the tools in Visual Accounts that can help you sell more to your exiting customers!
So...
 |
Q. Who are the easiest people to sell to? |
 |
A. People who have bought off you before! |
Whoa! I’m going to stop you right there. I said at the end of the last session that this session was going to be about Mail Merge. What’s selling got to do with Mail Merge?
You have an absolute goldmine in Visual Accounts and all you need to do is mine it. Now before you all think I’ve totally lost it, think - Where’s this goldmine?
|
Your Customers, they’re your goldmine |
 |
Your customers have already bought from you. They know your products. They know your service. They know your back up. They know you. If they have bought from you once, and didn’t have a negative experience, they will be more likely to buy from you again. They just need a little help which you can give them via VA2000.
Golden Rule
Always try and get a customer’s name and address.
OK you have a shop where people buy just small items. How on earth are you going to get their names and addresses?
You could try any or all of the following:
|
• Give them a written receipt and ask for their name and address |
|
• Ask them if the would like your newsletter sent to them (you do have one don’t you even if it’s only a list of special offers on a sheet of A4). You’ll need their name and address to send it out won’t you? (hint, if you want to do one using email talk to our good friends at Automatic Results http://www.automaticresults.com - or Cilick here to email them, tell them we sent you and they'll give you a discount!) |
|
• Run a weekly or monthly prize draw for something not too expensive, but worth having (a bottle of real champagne for example or a couple of tickets to the local theatre), and get entry forms which ask for name and address (or ask them to drop their business card in the box). Make sure each customer is reminded to enter the draw. Remember to tell the local newspapers, radio stations etc who won. Its free advertising! |
I’m sure you can think of lots of other ways as well.
This tutorial is about Visual Accounts, not marketing, so let’s see how we use these precious names and addresses.
This particular tutorial covers quite a lot of ground because of that I’ve split it into two sections. The first section, today, covers the Slow Payers Mail Merge Template which is part of the Templates, and tomorrow’s covers Sales & Marketing
Chasing Slow Payers
In the templates, which you can download from;
http://www.visualaccounts.co.uk/miscdown.htm
is a single Mail Merge template to chase late or slow payers. In tomorrow’s session we’re going to use that template to create a Sales Letter. But first we need to know a little more about VA2000’s Mail Merging.
You need to tell VA2000 which template to use so, without further ado, let’s
do that:
1. In VA2000 open SHIELDS3.VAD and click on Edit on the Menu bar
2. Click on Mail Merge Template…
3. Maximise it so it is easier to work with

4. Using the scrollbar come down to the bottom of the text because you need to
make two changes.
5. Under where it say “Yours sincerely” it says Steve Shields –
You’ll need to change that to your name.
6. Double click on Steve Shields and a new Window will open – this Window
is more fully described in the Help File (section 11) which accompanies VA2000
7. Click on the “Text” button

8. You can now change Steve Shields to your name
9. With the Window still open, press the down arrow key on your keyboard until
the letters MD appear

10. Change the MD to your title, or delete them as you wish
11. When you’re done click on OK then on OK again and you’re back
to the template
12. Come right down to the bottom of the template and you’ll see the slogan
“Plumbing to the Gentry”. We need to either delete the slogan or change
it
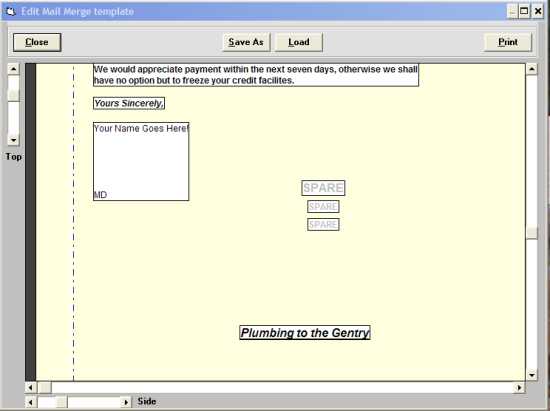
13. Double click on it

14. To make slogan invisible when printed remove the tick from the “Visible”
check box. OR
15. To alter it to your own slogan click on the “Text” button and
change the wording to suit as you did for your name
16. Click on OK (twice if necessary) to come back to the template and then click
on Save As
17. Give it the name of CHASE.TPL and click OK
18. Close the Template Editor and when asked to save click “Yes”
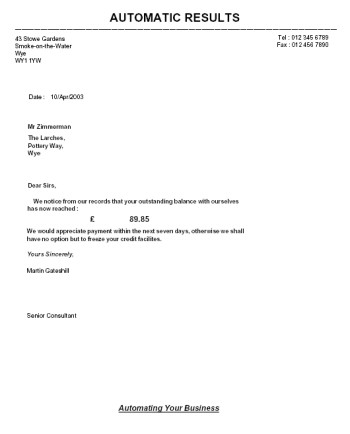
Let’s see if it works.
1. Click on “Report” on the Menu Bar
2. Click on Mail Merge…
3. The Mail Merge Window opens. Have a good look a round it.

4. Click on the “Customers with Outstanding Invoices” button and notice how Mr Zimmerman and Boyd’s Wet Fish are highlighted (you may need to move the scrollbar up to see Boyd’s Wet Fish)

5. Click on the “What Letter” button and make sure that the CHASE.TPL
is loaded.
A good tip is to always check that the correct template is loaded BEFORE you print – saves anguish later on if you have the wrong template loaded!

6. Close the Edit Template Window and press the “Report”
7. When the Letters have printed click on Cancel to close the Mail Merge Window.
Your printouts should look something like this...
Default Templates
Now would be a good time to discuss Default Templates.
VA2000 will store a default template, once you’ve created it, for each of the following types:
• Default Single Line Invoice
• Default Multi Line Invoice
• Default Remittance Advice
• Default Mail Merge
You must tell VA2000 which template is the Default Template for each type and it will then store that template internally. You can have as many templates for each type as you like and can swap and change between them.
So how do you tell VA2000 which is the Default Template for that type?
1. Click on Edit on the Menu Bar
2. Click on the Template Type you wish to use (Invoice, Remittance, and Mail Merge
etc)
3. Create the template, or if it is already created click on the “Load”
button
4. Click on the “Close” button
5. Click on “Yes” when asked to save – It is this action which
makes it the Default Template.
6. Repeat for all four of the Template Types: Single Line Invoice; Multi Line
Invoice; Remittance Advice; and Mail Merge.
Important
If you need to print from a different template you MUST make it the Default Template for that type BEFORE you start printing.
It’s unlikely that you’ll have more than one template for the Remittance Advice and each of the Invoices, so once you’ve created the Default Template for each of those, you can probably forget about them. But you may well have lots of templates for the Mail Merge. Therefore, when Mail Merging, get into the habit of checking that the correct one has been made the Default Template.
The first time you print 200 letters on your best paper using the wrong template will be the last time you forget to check you’re using the correct template!
Heavy Duty
You need to spend some time experimenting with the templates to get the hang of them. They are actually quite easy, but it does take a little while to “get your head a round the concept”. Look through the Help File at section ‘11. Letter Templates’ before the next session so that you are much more conversant with Templates.
So, I’m going to leave it there for now and cover the Sales and Marketing Letters in the next session.
See you tomorrow {FIRSTNAME}, when we'll look at making some money with Visual
Accounts!
Don't
wait any longer.
Click
here to register your copy of Visual Accounts now
and use your precious time on your business,
not on "doing the accounts".
Want this tutorial as a
FREE e-book?
Click here
to download it now